Sunday, July 22, 2012

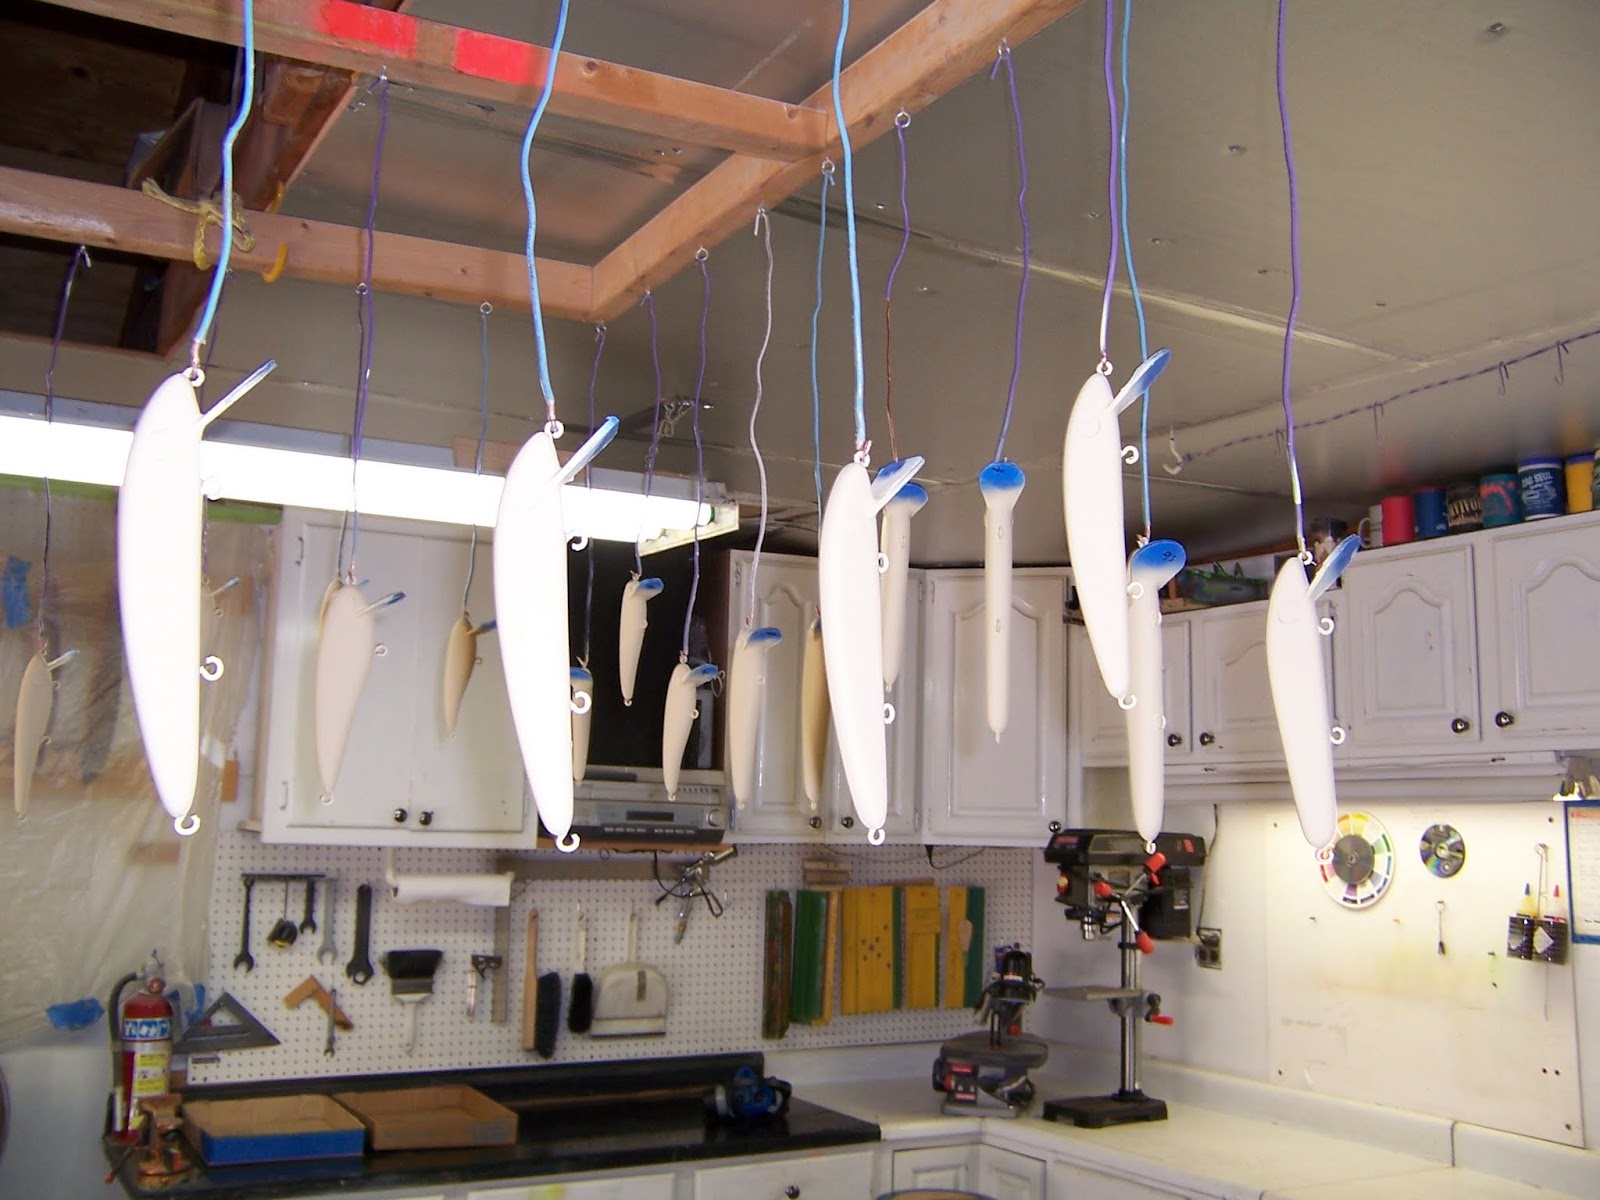
2012, Nine ready for clear


 I took new photos to help ease my mind, enjoy.
The tape we are using is a lot thicker than foil or leaf. You can see from the pictures that there is a definite edge. You can spend the time to soften this with multiple coats of clear and sanding, if you chose to spend your time that way. I have been there and done it, looks cool but not worth the time for this batch. Hopefully the Muskie Gods will forgive me! For those who may think it sloppy, evidently you have more time than I do.
This batch is for fishing, not personal critiquing. Use the knowledge you gain. Good or Bad.
As I have said before, I am not a photographer. I wish I could do justice to how this tape really looks. Maybe Frank will get some real photos going.  But anyway, it is cool to say the least. These are the first nine ready for clear. Seeing that I am unable to show the real value of the tape, the solid chrome is mirror chrome, the solid gold is mirror gold and both are a real mirror finish. The green and chartrues are prism, that pulls in colors of the bait. This is also the same for the one that looks orange to chartrues in the pics. 
I have no data to back it up, but I think all tape will reflect U V light, if present. This tape is so reflective it is unbelievable. If there is a light source it will reflect it.

Solid Gold tape

Solid Silver tape

Green prism tape

Chartreuse pearl tape

Solid Silver tape

Perch photo over gold leaf

 These are all in House of Kolor inter coat clear at the present, it gives me something other than paint to scuff before the real clear.
If you look at the two lures in green tape, you can tell how the tape picks up the color of the baits and changes. These are both the same tape, just different light. As for what it does in the water, if the sun is out, it is wild. If there is no sun, it is green prism tape.
Now that UV coatings have arrived on the market and seems to be coming the rage in manufactured baits,  slight delay from the original in 2006,??? I do not see a purpose, if you can reflect light and use hot colors when needed, it works. Not to say, a bright colored lure in clear water is bad, I do that quite a bit when the sun is out.
I am not a believer in the U V coatings being offered now days to enhance your lures color. I do believe in anything than can reflect light. Whether it be tape, foil or leaf, if it can reflect light  it can reflect U V. I personally can't get a grip on something I can't see and something that can not be proven or dis proven. Any promo you see that depicts a U V bait and fish, the only thing that is different is the bait. If U V light changes the color of the bait, then why doesn't it change the color of the fish ????
On the same vain of thought, you can see so far all these baits are hot colored. I might do all 76 this way, the water clarity for Green Bay at the Fox river is Zero. The Bay is are intended target.
The chartrues, chartrues green, and light orange are my triggers along with rattles.The reflective tape is a bonus. This will pick up and reflect any visible light source. So I believe, U V included

( Keep it in the Water.)


Sunday, July 15, 2012

Muskie Baits paint & tape

I already know that this should have started about a month ago , but as the world turns this is reality.  We all do the best we can for the time we have . So as a quick note, these are a few I was able to get paint on in 92 degree, 58% humidity weather, it's always fun. 


These musky baits all have tape on them, the new chrome and gold tape is fantastic. This new tape is a lot thinner than the colored tape, and really lays down nice. It has the best flash that I have seen to date.
There are four baits ready for clear in the pics and the others with a white top and belly are ready for color.
When  using the prism tape just remember, tape will not adhere to curves, keep it tight. If it buckles, bulges or creases it will be that way when it's finished. Any open or lifted edge will not work well in the end.
Frank, did a great looking hot perch and maybe he will pull it from the vault and share some pics. You can add it in here, if you would Frank.


I am not a photographer, as you can tell from the pics, but this tape is the ultimate if you are looking for flash. In solids or prism , you could not go wrong with using it.
There were a couple of memory lapses getting started , but I think we will get it on a roll quick enough.
 I not sure, but we may have lost Al to back problems and Tom finished all but three of his baits already.
So it appears that Frank and I are the slackers!
A little side note to all of this , we will be fishing dark water this year. A Canadian trip is out of the question for me . So the Great Lakes , Green bay is what are intent is, hence the hot colors, rattles and flash that will be created. You would be lucky to see something 2'-0" below the surface.
I wish they had  Zander in the Great Lakes, they get huge.

( Keep it in the Water )

Wednesday, July 4, 2012

Musky Baits in primer and tape

Well I finally put them all in primer and just a few with some tape just to show what they will start to look like. There is also one perch photo finish over gold leaf. The extra time came in because, I decided to install all the eyes before paint. I chose to use the forstner bit and give the eye location a little relief. In the past we put the stick on eyes after paint, no drilled in spot. I didn't want to have to play around with the eyes after paint this time. I used stick on label dots to cover the eyes from paint and also tried a liquid mask. The dots work just fine and the liquid mask ( latex ) did as well , just takes more time to apply. The dots did wrinkle a bit, and I did remove them, clean the eyes from any primer  and reapply new dots for the finish paint.
Keep in mind that none of this needs to be done ,unless you are trying to get the best possible finish you can.
I have not finished anything in envirotec as of late , just because of weight. Once I tank test this batch I will know if I can add any weight.
Garage Baits
click on photo to enlarge


Everything was weighed using the Archimedes dunk test and taken to the neutrally buoyant point. At the time, not all my eyes were in and I was giving 1 gram for eyes, 2 grams for paint in total and nothing for tape. The majority of these baits will have tape on them. Well the tape didn't amount to a gram, that is good. But the primer was between 2 and 3 grams. Come on, how much could paint on a lure possibly weigh! Now I know. I did make note off this in the bible and will see what the finish coats add in.This can all be rectified with some lighter hooks if need be, just wasn't my plan. I will fill the tank and test them out when all is done. Sinkers or floaters! 
The good news is, I have a few 3/4" aspen jerk - glide baits that this error in thought, will work ok with.
As for the Aspen baits, I will stick with Pine. The aspen was a bit hairy ( raised grain ) through out the process. The propionate always laid it down and smoothed it out but just not worth the effort if you have pine.
I will also be finished mixing the propionate with acetone. I don't care for the nature of acetone and I have used lacquer thinner a few times with equal or better results. Just a bit friendlier. We use Sunnyside and Squeak Kleen thinner a lot.    
The tape jobs are prism tape, I think this adds the most possible amount of flash to a lure. Even with a 5" bait you can put a nice metallic flash into it. Normally I put the tape on the bait and trim it to size using a single edge razor. Hit the edge with some sandpaper, wipe it down with thinner and give it a couple coats of envirotex spray or a good acrylic. After that scuff with a pad and add color.

I have played around with gold leaf, foil and photo finishes a bit and other than trying to imitate a fish with a photo finish or a scale pattern with foil, prism tape is pretty easy for the flash you get from it. With Kandies
( transparent paint) the tape can take on endless color changes.
WTP, witch craft products has a great selection of prism tapes. There is more than the red, green,gold and pink pearl scale patterns.    
As a little update, it was 102 degrees and 40 percent humidity in the garage today , I made it to 3:00 and called it quits. The beer was getting warm before I could drink it!

( Keep it in The Water )


Sunday, June 3, 2012

Musky bait build, June and Ready for paint.

 A few photos to see what was going on, from Archimedes to propionate.

There have been a few different things added and removed from the build this year. As you view the pictures you will see some of the new and the old.
10" thru wire Grande

10" Extreme thru wire
10"Perch thru wire

14" Perch thru wire

6" Egret

7"Extreme
6" Shore raider

14" Perch double line tie

7" Perch

6" jointed Shore raider

10" Bammer

3/4 aspen jerk - glide with worm screw

3/4 aspen jerk-glide drop belly with worm screw

3/4 aspen glide with worm screw

3/4 aspen drop belly glide

3/4 aspen drop belly jerk-glide

3/4 aspen glide with worm screw

 The first, is the use of Gorilla glue for lip installs. I have stated this before but this urethane glue really holds and is clean. Frank, Al and Tom followed the rules and scuffed the lips before glue and install, I did not. There is no noticeable difference in strength. The amount of glue needed is minimal and cost wise is cheap. I also used it to install the screw eyes, some are tight and others I can turn. This application would probably be done better with their version of super glue. I think this is the result of not getting enough glue in the hole.

The second change for me , was using the Archimedes dunk test. I was a little ahead of the game last year when I ran across the tackle underground article, after I had put my weight in. Which by the way is a great site for information and seeing what others are doing.
Anyway, I was able to use the dunk test and it was impressive, as to ease of use. The only thing you really have to do is, make sure the bait is sealed. If it is not totally sealed, once it is dunked it will soak in water as you are weighing it. This will result in an inaccurate weight
I took my batch to the edge allowing a little room for eyes and paint. I am looking to get as close to neutrally buoyant as possible. These crank baits will serve as, trolling baits, twitch baits and jerk baits.

Just so we don't have to keep guessing, we will take the time to weigh the baits before and after paint so we have a reference point in the future.

The third change for me was in propionate. I wanted a soaking verses a coating, and it worked quite well.
The soaking gives me a deeper seal and allows me to still tweak the bait with sanding. After every thing was completed, I used a paint brush to put a coating of propionate on the outside of the lure. I found that if you brush it on and keep brushing,  propionate will coat the bait without brush strokes. In fact it leaves a rather smooth surface if brushed out. After that, a little 220 grit sanding and it becomes a really smooth finish.

 A couple of other tweaks, were to install worm screws on the rears of the 3/4" aspen jerk/glide baits. Unless you are going to work these very fast, where a rattle would come into play. I opted for a soft tail.
The first few I did not cut the tail section, then I realized the tail of the bait needed to be cut flat to about a 7/16ths thickness. This allowed me to drill a 3/8" hole with the forstner bit and glue in a #8 x 1/2" stainless steel sheet metal screw. I tapered the body to the tail section with sand paper and epoxied the worm screws into the drilled out 3/8" pocket. This let's the worm tail be relatively flush to the wood with no interruption to water flow.
The two worm attachments I made on the 14" perch are exposed drywall anchors, does the same job, but I like the little recces for the worm on the aspen baits better.
The only other twist, was making one of the 14" perch baits with both a body nose tie and a lip tie. I wanted to be able to see what the difference was within the same bait.

So a little more 220# sanding on the pine batch and weight for the aspen, I will be painting.
I have to get some more lips or make them for the rest of the aspen cranks. I didn't like what I originally got for them.

( Keep it in the Water ) 


Saturday, May 5, 2012

Pine Musky bait update Two

The pine batch is ready for weight.  The lip install went relatively easy and clean on this batch.
When Frank and Tom had installed their lips, we used a syringe and a wet rag to dampen the slot . The Gorilla glue is moisture cured, so there is a need to wet the surface before gluing. I had a small artist paint brush and decided to use it to moisten the slot. This worked out well and was very controllable. I also used a small flat blade screw driver to butter the slot in the bait with the Gorilla glue. You only need a small amount, it does expand 3 times of what is used.
I would suggest that the lip slot be cut to hold the lip without falling out, but not so tight that you have to use pressure and wiggle it into the slot. This will allow for a good bond. Any type of glue or adhesive has an optimal film thickness in order to create a bond, you have to allow the space for this to happen. Gorilla glue is no different. The glue starts to expand almost immediately with the right amount of moisture. This process keeps the lip from sliding around . You still have to baby sit them as you go. 

The temperature was in the low 60s for the first batch and high 70s for the second. I noticed on the last batch that the glue was activating faster ( foaming ) and set quicker. We will see how it works on Al's lips.
I do have some rather shallow slots in these baits for the lips, but this glue seems to really hold tight.
On all lip installs, we rough up the surface area on the lip that is going to be glued. This is a good practice, but I did not. As of yet , I have seen no difference in bonding strength. With the depth of my slots , I feel the Gorilla glue is holding better than epoxy would.   
As I set and finished aligning one bait lip, I would go back and wipe the foamed Gorilla glue off the previous one. This keeps it a bit cleaner and less to sand later.


I did run a small bead of epoxy around the lip, where it meets the wood body. I don't know if it is needed, but for the extra strength it adds I think it is worth the time. This to was applied with a very small screw driver and 5 minute epoxy. 
A few belly screw eyes some hooks and it's on to lead! 
The eye locations are rattle chambers and will get epoxied in 3d stick on eyes. I prefer to have a small pocket to glue the eyes into and this works well.


( Keep it in the Water )


Sunday, April 29, 2012

Bait building, rattles and slot

Well, progress has been a bit slow but we should be able to start installing some lips ( bibs ) today.
These are some pics of the rattle chambers and slot.
I think for the most part everyone is finished with rattles and have put in the front and rear screw eyes. We leave the hook hangers out until after lip installation. The jigs we have were made for 14" baits, so the hole for hangers are not there for the smaller ones.


My 10" baits are .052 wire and the 14" perch baits I used .062. I am also adding a cut down worm tail to 2 of the perch baits using a plastic screw wall anchor. I will get some pics to show.
We are also going to try using Gorilla glue on the lips.  I did a test bait with some and it was impressive. With epoxy lip installs you can normally get the lip to crack loose by hand. On this, I had to put the lip in a vise and twist it from the tail of the bait to break it loose. This was in a 14" bait!
I haven't had time to play much with the aspen baits but I will get going on them again.
There are some added pics from the lip install. The Gorilla glue really seemed to hold well, and was a much cleaner install on the lips. Next they will get a bead of epoxy at the lip to wood area for extra strength. The jigs shown are a real help in aligning the lip, making it as true as we can get them.The hot dog boards are for holding the baits during different processes.
The worm tail attachment was relatively simple also. The rear hook hanger was held in, as to allow a barb to be placed in the worm tail . This was with the thought of keeping the hook secured to the tail and not flopping around. Maybe it will pay off for all those following nippers, that love to nip the tails off.  

( Keep it in the Water )

Sunday, April 8, 2012

Update to Bait Build 2012

A Propionate Soak.

In my attempt to stay a little ahead on the build, I needed to get my pine batch into the propionate. Time just wasn't working with me. I decided to break up the 36 pine baits into three separate jars, 10", 8", and 6". This entailed arranging the baits in the jars so they were submerged and weighted to stay there. Then sealed the jars. When time permitted I would open the jars and let them breathe. There wasn't a lot of room at the tops and I thought it would help in maintaining negative pressure in the jar to let the air escape ( burping).

I do not have a formula for the mix, surprise. I use the mix ratio once at the beginning and change it for my needs, that's where a thick and thin jar comes in. This mix was closer to water than 2% milk, some where in between I guess? I was looking for a penetrating soak, trying to seal the bait's not just coat them. So as time permitted, 48 hours later?  I ran some temp screw eyes in and hung them up to dry. Once they dried out I did a quick dip in the same jars and let them dry. The next day I was able to sand them down.

As I was sanding, I realized that the consistency and feel of the propionate on these baits ( you can see the difference between raw wood sanding dust and propionate sanding dust ) was that of my baits from last year. Last years baits were soaked three times and coated three times? All tolled, about a day's work.

I am only looking to seal the pine wood bait's and think this worked well to do just that. I find no need to build a coating of propionate on the surface as we use a 2 part automotive primer for paint.
If you are using propionate, keep in mind the film thickness of a coating and what you are trying to accomplish.
A coating is better achieved with a little thicker mix, a soak a little thinner. I have not had a lot of success with the propionate as a clear top coat, nor have I put the time in to perfect it. There really isn't a wrong way of doing it. This just gave me the time to accomplish my task, with the same or better results.
Note. Unless you like watching the air bubbles, you do not have to use glass jars. Just make sure what ever you do use doesn't melt from the acetone?

( Keep it in the Water )